Archive for August, 2016

Simple Step Stool

A while back I added a 2nd clothes hanger bar in my Wife’s closet for additional space. I had to move the old bar up a bit, which made getting to the top shelf impossible for her without a step stool. We had one downstairs that was rarely used so she just moved that upstairs until I could build one. She wanted a wooden one that collapsed for storage.

I have a lot of birch so I decided to use that. It isn’t a centre piece in our home, so I don’t want to “waste” my good ash or oak on it. 🙂 I actually had 2 pieces of birch & maple already milled to just over 3/4″ thickness from the toy box earlier on this year. So I just had to mill a couple small pieces for the legs. I found the design on Lumberjocks that my wife really liked, and then I found another one on Lumberjocks that had the angles and lengths of the pieces. Perfect! No guess work!

The plans called for 1/2″ wooden dowel, but I thought 1/2″ bolt would be more secure. I painted them brown to kind-of blend in, and finished the wood with spray lacquer. This is the first time I used spray lacquer. It sure does dry fast!

Pretty happy with the overall end product. Hopefully it last a long time! Here is a picture of the completed stool opened and folded flat.

Birch Step Stool

Folded Step Stool

Rubik’s Cube Display Case

I have a lot of Rubik’s cubes. A LOT. It all started Winter 2010. I was thinking of things I could put on my Christmas list for my family. I wanted something I wouldn’t normally buy for myself, but something I always wanted. I saw a Rubik’s cube while walking through the mall at lunch and thought it would be cool if I could solve one. I had one when I was a kid, but never really tried to solve it other than pealing the stickers off and putting them back on in their proper location. So I added it to my list. I ended up getting two of them for Christmas. One from my Brother and the other from my wife Roseanne (who was my fiancée at the time). I didn’t mind because that meant I could have one at home and one at Roseanne’s. I had the week after Christmas off and spend the entire time trying to solve it. About a week later, I did it! The only logical step from there would be to get faster and faster. By the time I had to go back to work after New Years I had my time down to 3 minutes. I figured if I kept at it I could get better. After a while I ended up getting an average of about 1 1/2 minutes. Since then, I average less than a minute with my best time being 42 seconds. Not great considering the world record is around 5 seconds. But at that point you need to memorize a lot of algorithms in order to get that time.

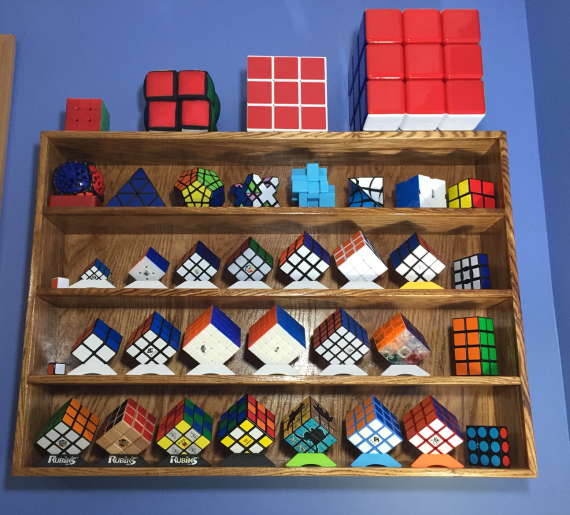
I don’t know why, but I have been addicted to buying Rubik’s cubes. I have 82 of them right now. 30-ish of them are cheap cubes I bought to make a mosaic of Mario from Super Mario Bros. A picture of that could be seen on my Instagram page. The remainder are at work, a couple spots where I sit at home, and the rest are in this cabinet. Most are the standard 3x3x3 or 3x3x3 shape mods, but I also have many other types of twisty puzzles. You can see all the different types in the cabinet. The ones at work and other places at home are just different manufacturers of the same type of cubes you see in the picture below.

My cubes were sitting in various spots in my house and at work. I always wanted to make a display case for them. With some left over 1/2″ oak plywood I made a basic case and wrapped it in ash hardwood for the face frame. I had my wife stain and finish it with polyurethane while I worked on my Chisel rack. I hung it on an open spot on the wall in our bedroom on my side of the bed. I really like how it looks.

Rubik's Cube Case

Chisel Rack/Display Case

While the finish was drying on my Rubik’s cube display case, I decided to finish off a project I started a few months ago. My wife bought me a set of 16 chisels (2 separate sets actually) for Christmas, and they were sitting on the table for months waiting for a home. I wanted to have a rack beside my bench so I can quickly grab the chisel I need. I found a simple chisel rack on LumberJocks that I really liked and wanted to use that design. That one was a little too simple for my needs since I had so many. I decided to mount it on a scrap piece of 1/2 plywood left over from the drawer bottoms on my coffee table/end table project as well as some oak cut offs from that project as well. I wrapped the plywood in oak, and then started mapping out where all the chisels could fit. I ended up deciding on the regular chisels on top, the mortise chisels on the bottom right, and the left side left for “future enhancement”. 🙂   Fast forward a month, or two. While placing an order on LeeValley I decided to order 2 skew chisels that matched the set my wife bought me. And might as well get a leather strop for honing the chisels while I am at it. It looked like I had the space I left in my chisel rack. The semi-completed rack was hung on the wall with the chisels installed until this past week. I removed the chisels, added the new section for the skew chisels and strop, and then disassembled, plugged the holes with my fancy plug cutter I bought for the toy box build (I screwed in the sides since I was just for the shop) and sanded. I think the sanding is what stopped me from finishing it when I “finished” it the first time. I hate sanding.

The chisel rack only has polyurethane on it to protect it. I didn’t bother staining it since it was for the shop. Very happy to finally have this done. I have been on fire recently! Completing everything very quickly and moving onto my next project. You never know, maybe I will go back to my tetris shelves I started a few years ago that now sit on the shelf in the garage. I have a few of them done, but still had about 5 to go I think. I’ll post a picture on my Instagram about those.

Chisel Rack

Kitchen/Dining Room Shelf

I’ve been wanting to redo a shelf/bookcase we have separating the dining room and the living room for a while now. It is about 4′ tall and currently painted the same colour as the living room and is a nice separation between the two rooms. I want to redo it in Oak to match the other woodwork we have in the house. Perhaps even put doors on it to keep the dust out. We have pictures and nik-naks on the shelves as well as my wife’s Winnie the Pooh jars. They are meant for flour, sugar etc. but they have just been decoration for a while now. When trying to convince my wife of the project I suggested me building a shelf in the kitchen/dining room for the jars. I have had a design in mind for a long time based on something I saw in a Sears catalogue.  She liked the idea and added it to my “woodworking to do” list she has. 🙂

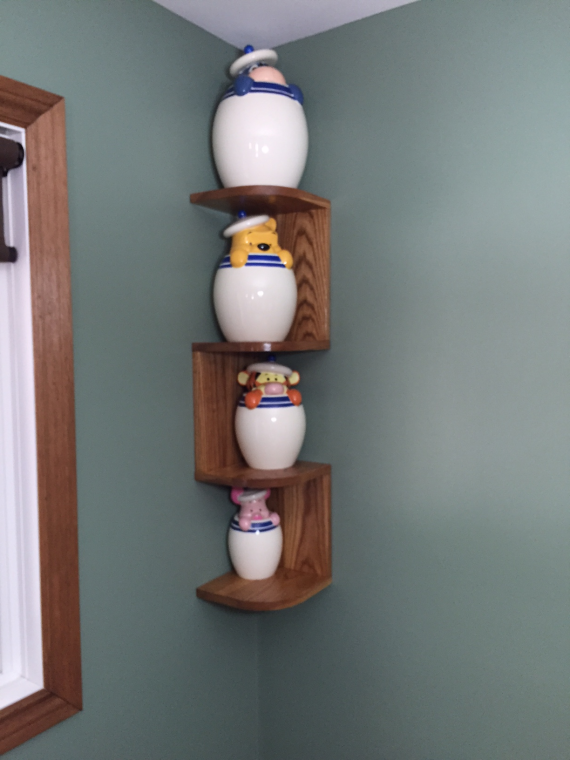
The shelf itself was very easy to do. I first measured the height of the jars. Piglete is 8.5″ tall, Tigger is 9.5″, Pooh is 10.5″, and Eeyore is 11.5″ tall. I thought Eeyore could go on top, so I just needed 4 shelves total. I made the shelves 8″ wide out of Ash. I had some 4″ wide boards so I milled and glued them together to make two 8″ wide boards. I then cut them to the right lengths, rounded the corners of the shelves and joined them together using pocket hole joinery. Nice and quick. I then had my wife do the stain and finishing since she did such an excellent job on the cabinet in our breezeway so I can get started on my next project. After it was all finished I put some pegs in the end of the top and bottom shelves that would go into the wall to help support the shelf. I then held it into place, made sure Eeyore would fit on top, and screwed them into the studs.

This project turned out great and we are both very happy to have this nice little shelf beside our kitchen table.Ash Shelf

Full Shelf

Oak/Ash Cabinet for Breezeway

I’ve always wanted to build a small cabinet beside the door leading into the garage. Pain, stains and glues shouldn’t really be exposed to near feeezing temperatures as it decreases their lifespan. This year my wife suggested a cabinet there to store our garding stuff that has been sitting on an old TV tray table we had. So after some discussion we decided on a large cabinet. This cabinet is 8 feet tall and almost 4 feet wide (about 42″). Why almost? Because at 48″ our door to the back yard would hit the cabinet.  🙂

The cabinet itself is made out of 3 sheets of 3/4″ Oak plywood. I used plywood for the sides, shelves and back. I know 3/4″ plywood on the back is way more then required, but it was only $50 a sheet due to a sale. 1/2″ Oak plywood was $70 a sheet. I trimmed the front faceframe, shelves and doors with Ash hardwood. It looks very similar to Oak and I still have quite a bit on hand from a previous purchase.

The cabinet was finished with Minwax Golden Oak stain, and then polyurethane. This was a very large project to finish, so I enlisted the help of my apprentice (my Wife Roseanne). I think she did an excellent job.

I built the cabinet on a base 5 1.2″ above the floor. That way it can sit flush against the wall above the baseboards. I screwed the cabinet to the wall so for extra support. This thing isn’t going anywhere!

Due to it’s location (in a hallway), I can’t really take a decent picture of it directly facing the unit. So here is a picture of the completed cabinet installed, a picture with it standing up without doors on awaiting installation, as well as laying down on my assembly table with doors installed.

Very happy with the results. (And thanks to my brother to help move this beast into palce!)


Finished Cabinet


Cabinet Laying down

Cabinet without doors

Now on Instagram

I decided to start posting pictures to Instagram. Mainly progress pictures of projects and pens. I am still posting projects here. But since I am making a lot of pens, I figured I would post them as I made them on Instagram and updating the site when I have a punch to post. You can see the last 6 posts on the column to the right.

You can also go directly to my profile by clicking here: Rich Eklund Instagram